Saturday 25 November 2017

Anastasia Beverly Hills Limited Edition Holiday Prism Palette Swatches & Review


Hey there Cupcakes! Happy Saturday! 


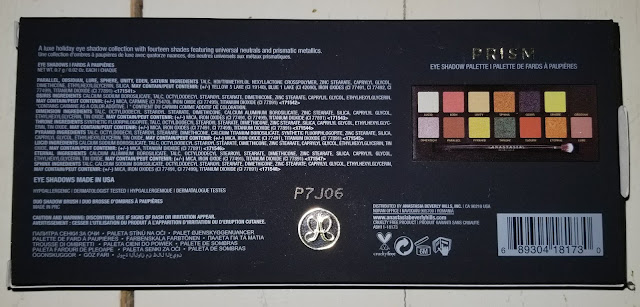
Today I am going to be talking about the newest Eye Shadow Palette from Anastasia Beverly Hills. Prism is it's name, and lots of gorgeous mattes, duo chromes, and shimmers are it's game. This palette is a limited edition Holiday release and is available on both the ABH website, as well as Sephora. The Palette retails for $42 USD ($ 55 CAD) and contains 14 shadows.

As many of you probably know there was a lot of drama that surrounded the launch of ABHs previous Palette Subculture. Many people in the YouTube community came out with videos exhibiting that the palette was not working or blending well for them. Therefore there was a lot of concern that Prism would have the same issues. I myself had very minimal problems with Subculture and have had no issues creating numerous looks that I have been very pleased with and have gotten many compliments on. Maybe I just got lucky and got a palette from a better batch.

However we aren't here to talk about Subculture we are here to talk about Prism!!


 While ABH has come forward and stated that Subculture was more a palette of pressed pigments (hence the large difference in the formulations that we saw on release) You can see that Prism has a more flushed out formula more comparable to that of Modern Renaissance. There are a few colors in Prism that are pressed pigments but at least this time we were aware of that at launch and could make an education decision about whether or not we would enjoy this palette based on our individual past experiences with Subculture. While I understand that some of you who maybe had a more negative experience with Subculture might be apprehensive to try this palette, let me assure you it is worth your time and money! I have even already shared one look with this awesome palette in a previous post which I will link here so you can go check it out for yourself!


While I know, and agree that swatches are not the best representation of how a shadow will actually work and apply with a brush, they are a good indicator of how you might like the tones of the palette against your skin tone so I did some swatches of this lovely palette for you! Seriously guys these are just as beautiful applied to the eye. So many lovely halo eye and cut crease looks come to my mind it's almost overwhelming! Don't worry though when I create them you will see them either here or on my Facebook page!

So review wise guys I've used this palette at least six times now guys and I have had no issues. It blends well, the shimmers apply well (i use my finger no fix plus or anything) and then apply in the more detailed areas with a small dense eye brush. I used the brush that came with the palette for application and blending because I typically find that if a palette comes with a brush, the brush typically works well with the product it is being presented with. Every look you see me create with this palette will be achieved with the palettes own brush because I actually love the way it applies the product to the eye as it isn't a large blending brush which I appreciate because I personally prefer a smaller blending brush for my eye shape and size - it just works better for me. I love this Palette personally, I think it is going to be a serious staple for all of my Holiday looks as there are so many color combos that would be perfect for your Christmas and New Years Festivities. Rest assured that I will be doing some looks and tutorials for Holiday Makeup looks in the coming weeks so that you lovelies can all have some Festive inspiration! <3

Well that about wraps it up for today Cupcakes. Thanks so much for taking the time to stop by today and check out my latest review. If you liked this post I would really appreciate it if you would comment with feedback, or follow to stay in the loop. You can also follow me on my Facebook page Cupcake Beauty It would really help me out! Have a great weekend Cupcakes and I will catch you in my next post!

Xx Jenn


Thursday 23 November 2017

Pastel Cut Crease Eye look using Urban Decay Gwen Stefani Palette & Kat Von D Pastel Goth Palette


A close up shot of the finished look. Not colors I typically am drawn towards but I really like it!


Hey there Cupcakes! Thanks once again for joining me today for another Makeup look. Today I was challenged to re-create a look that a friend found on Pinterest. While I didn't have the exact colors that were pictured in the source inspiration I used the most comparable colors that I had in my arsenal and I was personally quite pleased with the final look that I was able to create.


Pictured above are all of the products used to create this look.


For those of you interested in how I created this look keep reading!
For my face Makeup today I first primed my clean skin with Arbonne Makeup Primer. I then used 3 separate Arbonne foundations! Why 3 you might ask? Well, because I used one shade for all over foundation (Soft Blush), one for highlighting (Porcelain used like a liquid concealer) and one for a bit of contouring (Rosy Beige)! It all worked out and blended together flawlessly even though this was the first time using this technique with the Arbonne Foundations. I highly recommend the Arbonne Foundations. They give beautiful full coverage to imperfections, but don't hide my freckles unless I guild the coverage up which is an automatic WIN for me because i LOVE my freckles to show through!


For the eye look I used a total of 8 Shadow shades spanning between the Urban Decay Cosmetics Gwen Stefani Palette, and the Kat Von D Beauty Pastel Goth Palette. 


First I primed my eye lids with Urban Decay Primer Potion in Eden. This is a super good eye shadow primer if you have any redness concerns in the eye area. It has a light flesh tone to it so it helps to act as a bit of a concealer for your eyelid allowing the shadows to pop more and stay on your eyelids better as oils build up on your skin throughout the course of the day. For my Cheekbone Highlight I used the highlighter shade in the Sweet Peach Glow Palette by Too Faced Cosmetics, and for my lip color I used Tarteist lip paint in shade Rosè.

I began this eye look with the Gwen Stefani Palette by Urban Decay Cosmetics. I first went in with shade "Blonde" as an all over color. This color looks almost no different on my skin but I am not looking for color pay off with this shade, i am just putting it down to help with smoother blending of the cut crease look. After I applied "Blonde" all over both eyes I next went in with "Stark", "Anaheim", and "Zone" respectively gradually building up the depth of color in the crease of the eye. Once I was satisfied with the marriage of those three colors I then tapped into a deeper reddish brown shade in the same palette called "Punk". I used "Punk" as the darkest shade in my crease for this cut crease look. With a very light hand I guided "Punk" along the crease line which I had been blending together previously and extending out into a small wing on the outer edge of the eye. Everyone will have a different eye shape and preference so for this step you will just need to evaluate where the tail looks best on your eye for your personal preference same as with winged liner.
Next I went back in with the Urban Decay Primer Potion in shade eden to cut my crease. Most commonly a concealer is used to cut the crease but I only have cream stick concealers on hand at the moment so I went with the primer as a good replacement option.
After I finished blanking out the cut crease area and mirrored "Blonde" and "Punk" on my lower lash line it was time to haul out the Kat Von D Pastel Goth Palette to finish the look.
I used 2 shades from the Pastel Goth Palette in this eye look. First I went in with "Skull" and patted this color into the area that I just cut out with the Primer Potion. I laid down this white shadow to make the blue color pop even more than with primer alone. Once I had "Skull" all laid down to my satisfaction I dipped into "Doom" a very vibrant pastel blue. I patted this shade all over top of where I just placed the shade "Skull".

Once the shadows were all laid down to my liking I went in Kat Von D Beauty Tattoo Liner in Trooper to create my winged liner look. I ran Urban Decay Heavy Metal Glitter Liner in "Midnight Cowboy" along the crease line and extended it outwards parallel to the winged liner below it. I then finished up the eye look with a Marc Jacobs Eyeliner on my lower water line, and Benefits Roller Lash Mascara on both my top and bottom lashes.

Well there you have it Cupcakes! A look at and quick walk through of how I achieved this poppin' Princess Jasmine looking cut crease today. I hope you guys enjoyed this post and if you like what I do and want to keep up to date with all my future posts please subscribe and leave a comment I would love to hear what you think of this look below! Thanks for stopping by again Cupcakes. I can't wait to see you again!

Xx Jenn

Wednesday 22 November 2017

Dramatic Smoky Eye and Red Lip Combo is a Night Out Classic


Good Morning Cupcakes! Thanks for stopping by today to check out the look of the day. Recently it was requested for me to do a tutorial for a dramatic evening out look with a nice smoky eye, and dramatic red lip. Naturally I was keen to get right down to it and have some fun with a look that I don't often go for but love. If you would like to see how I created this look you can check out my first YouTube video ! I apologize that it's a little long winded, but I assure you that I now have editing software, and am revamping my shooting style so I will be on my feet in no time I'm sure :) If you check it out and like what I do, or think you might like to stick around to the see if you enjoy the show feel free to subscribe and follow me!

Thanks for stopping by for a quick makeup moment today cupcakes. Can't wait to show you what I create tomorrow! If you have any requests for looks that you would like to see created let me know in the comments below, or on the video and I will do my best to get them done! As always have a fabulous day all <3

Xx Jenn

Monday 20 November 2017

Simple Daytime Smokey Eye with Anastasia Beverley Hills (ABH) Prism Palette

Hello lovely Cupcakes!
Welcome to my very first post on Cupcake Beauty. Please bear with me while I find the right spots in my home for the best lighting and clarity of photos. As this is my first post taking these types of makeup shots I assure you that this is a kicking off point and I will learn the best photo set up as we go :)

I thought it only fitting that for my very first post I would begin with a super simple daytime smokey eye using Prism which is the newest eye shadow palette to drop from Anastasia Beverly Hills. This palette is currently sold out on the ABH website but I personally picked mine up a few weeks ago from Sephora. So without further ado let's get into it.


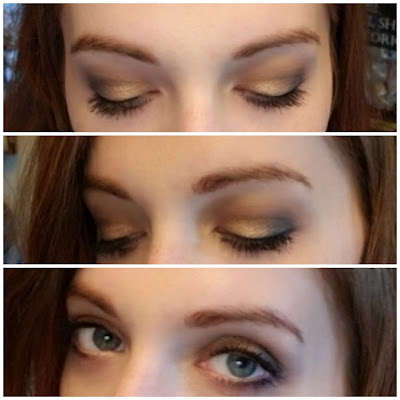
Pictured above are the items that I used to create today's look and below a few close up eye shots of the finished eye look.

I began with Maybelline Baby skin pore filling primer. This is a good well priced drug store primer that I have had in my personal arsenal for a few years now. It creates a nice smooth canvas for the rest of your makeup to affix to and it helps even out the skins texture to smooth out your pores a bit for more even application.


Next I moved on to foundation and concealer today I used Arbonne Perfecting Liquid Foundation in Porcelain, and Revlon Photo ready concealer in shade Fair. I then set my foundation and concealer with Arbonne Setting Pretty Translucent setting powder for a nice airbrushed look to the skin while also securing my face makeup.

Next I used a simple Bonne Belle brow pencil in Brunette to fill in my brows. I prefer a more natural brow to a strong Instagram eyebrow for my own self personally so I went more natural and just filled in some sparse patches from those years of over plucking. As always make sure to use that spoolie to blend the colour through the brow hairs for a soft natural look.

Next I finished off my face makeup with Nars Blush in Orgasm, Too Faced Milk Chocolate Soleil matte bronzer in Medium, and Kylie Cosmetics Kylighter in Cotton Candy Cream. I made sure to use a very subtle hand with the blush and bronzer today as I just wanted to bring a little colour in to the face, but remain very low key and elegant.

For my eyes I used the Prism Palette from ABH. I began with Unity as an all over lid colour, swept some lure into my crease for depth and definition, built up my outer v with Obsidian and patted Sphinx and Pyramid onto my lid. Remember to take your time and blend your shadows for the most soft and even appearance. Harsh lines are the enemy in makeup as any MUA will tell you it pays to spend a few extra minutes blending to make sure everything is perfect. I then used one of my all time favorite mascaras Benefit Roller lash to complete the simple day time smokey look.

For my lips I wanted to again keep it very simple and play up the eyes so rather than a solid lip colour I opted for a lip plumper and a gloss. I applied Too Faced Lip Injection Extreme gloss to my lips while applying my other makeup and once I was finished with my whole face I applied a coat of Too Faced Sweet Peach Oil Lip Gloss in Pure Peach for a nice plump moisturized pout.

So there we have it Cupcakes! Here are some photos of the finished result. I know that this is a rather simple look but I figured simple and every day was the best way to kick things off. Again apologies for the less than optimal pictures this time. I promise that as I go along I will work out the perfect methods for photos and post composition.


So what do you think Cupcakes?! Do you love it? Hate it? Somewhere in between? Leave me a comment below and let me know your feedback! Have a look you would like to see me create? Drop me a comment or send me a DM and I will do my best to make it happen for you! Want to see videos? Let me know I'm open to lot's of options this is just the beginning!

Thanks again for stopping by guys! I hope you enjoyed this post and I hope you'll pop in again tomorrow for another look from me Jenn at Cupcake Beauty!!

Xx  Jenn


Welcome My Cupcakes!!


Hello my darling Cupcakes! Welcome to Cupcake Beauty! If any of you remember a few years ago I used to curate a blog that was just for nail art and nail polish. However I started a job that didn't allow me to have painted nails! Of course naturally working full time this meant that I no longer had all of the time for the lovely intricate nail art that I used to create. While I still paint my nails (and buy too much polish) I have taken my focus also into Makeup and beauty. My interests have always been in two places I just prefer to focus mainly on one thing at a time. I am a self taught, freelance makeup artist who just wants to share what I love doing!

I am very excited to begin this venture with you all and I hope that you will enjoy my future posts and videos. If you like what I do please remember to subscribe to follow me to stay up to date with what's going on in the world of Cupcake Beauty.

I love you guys and I can't wait to share my love of Makeup with you. Stay tuned

Also if you want to keep in touch as often as possible make sure to like and follow my Facebook page!

Cheers XX
Jenn <3